User Guide
This guide provides everything a CS1101S Teaching Assistant (TA) needs to know to get the most out of JARVIS!
To use this guide, simply click on the items you would like to learn more about in the table of contents, or scroll down to the relevant sections.
Table of Contents
- What is JARVIS?
- Using this guide
- The Basics
- Quick start
- Basic commands
- Student commands
- Task commands
-
Lesson commands
- Adding a studio lesson :
addstudio - Adding a consult lesson :
addconsult - Adding a mastery check lesson :
addmc - Deleting a lesson :
deletelesson - Marking a lesson as completed :
marklesson - Marking a lesson as not completed :
unmarklesson - Marking a student as present for a lesson :
markstudent - Marking a student as absent for a lesson :
unmarkstudent - Adding a note to a lesson :
addnote - Deleting a note from a lesson :
deletenote - Adding participation for a student in a lesson :
addpart
- Adding a studio lesson :
- Saving the data
- Editing the data file
- FAQ
- Command summary
What is JARVIS?
JARVIS is a desktop app for a CS1101S Teaching Assistant to manage students, tasks and lessons, optimized for use via a Command Line Interface (CLI) while still having the benefits of a Graphical User Interface (GUI).
Using JARVIS, the TA can
- keep track of their students’ grades for each graded assignment
- see the tasks that they have do and their respective deadlines
- plan for upcoming tutorial classes and consultations
If you are a CS1101S TA who is familiar with Command Line Interface and can type fast, JARVIS will allow you to efficiently manage your students, tasks and lessons.
Using this guide
Before reading the rest of this guide, you might find it helpful to know the meanings of icons and syntax used!
| Icons/Syntax | Meaning |
|---|---|
| Information that you should take note of | |
| Useful advice | |
| Warnings you should read before proceeding | |
markdown |
Commands or examples |
The Basics
There are 3 main entities in JARVIS - Students, Tasks and Lessons.
- Student entity: Represents a student of the TA
- Task entity: Represents a task (to be) completed by the TA
- Lesson entity: Represents a lesson (to be) conducted by the TA
JARVIS takes in user input via Command Line Interface (CLI) commands. These CLI commands can be categorised into 4 main types - Basic, Student, Task and Lesson commands.
- Basic commands: General-purpose commands that are not tied to a single entity (e.g. a command used to exit the app)
- Student commands: Used for managing Student entities (e.g. adding/deleting students)
- Task commands: Used for managing Task entities (e.g. marking tasks as completed)
- Lesson commands: Used for managing Lesson entities (e.g. recording attendance for a lesson)
To execute a command, type it into the command box and press Enter. Refer to Quick start for an illustration of this.
Commands have to be written in the correct format to be used. The format for each command is specified using the convention below.
![]() Notes about the command format:
Notes about the command format:
-
Words in
UPPER_CASEare the parameters to be supplied by the user.
e.g. inaddstudent s/STUDENT_NAME m/MATRIC_NUM,STUDENT_NAMEandMATRIC_NUMare parameters which can be used asaddstudent s/John Doe m/A0123459G. -
Items in square brackets are optional.
e.g.t/TASK_DESC [d/DEADLINE]can be used ast/Mark quest 2 d/2022-11-01or ast/Mark quest 2. -
Parameters can be in any order.
e.g. if the command specifiest/TASK_DESC d/DEADLINE,d/DEADLINE t/TASK_DESCis also acceptable. -
If a parameter is expected multiple times in the command such as student index in adding a consult lesson, all occurrences of the parameter will be considered.
e.g. if you specifysi/1 si/2in a command expecting multiplesi/parameters, bothsi/1andsi/2will be considered. -
If a parameter is expected only once in the command, but you specified it multiple times, only the last occurrence of the parameter will be taken.
e.g. if you specifys/John Tan s/Sally Yeoh, onlys/Sally Yeohwill be taken. -
Extraneous parameters for commands that do not take in parameters (such as
help,listall,exitandclear) will be ignored.
e.g. if you inputhelp 123, it will be interpreted ashelp.
Quick start
-
Ensure you have Java
11or above installed in your computer.- If you already have Java installed, you may follow these instructions on how to check which version you have installed.
- If you have not installed, you may download Java for your OS from this website.
 Note: JARVIS is supported on Windows, Linux, and OS-X platforms.
-
Download the latest
jarvis.jarfrom here. -
Copy the file to the folder you want to use as the home folder for JARVIS.
-
Double-click the file to start the app. The GUI should appear in a few seconds. Set the app to fullscreen for a better view of the sample data.
-
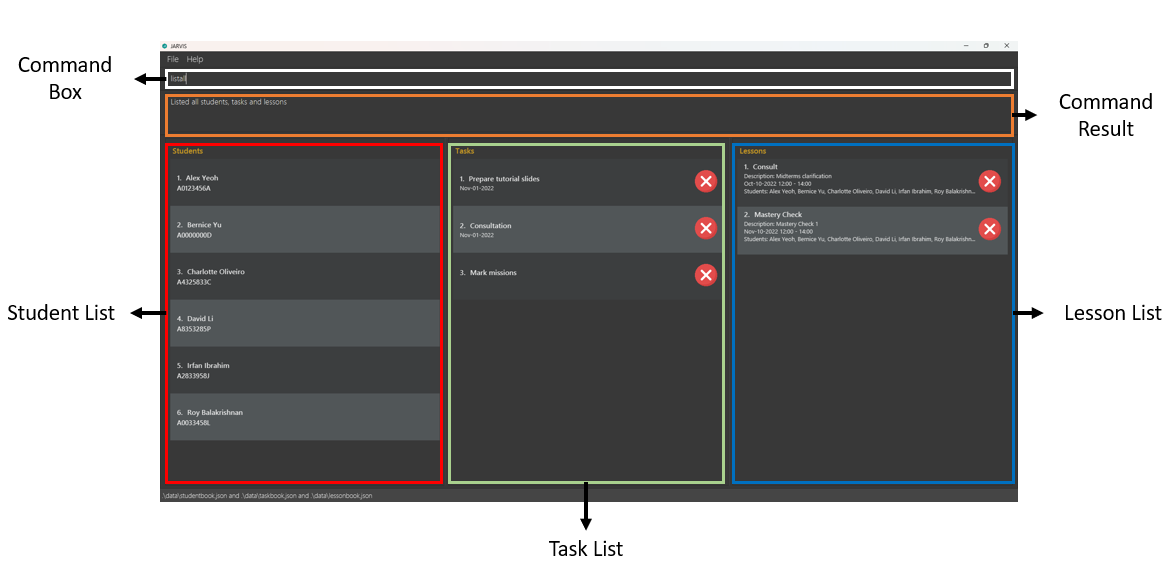
Type the command in the Command Box and press Enter to execute it. e.g. typing
helpand pressing Enter will open the help window. Tip: The following diagram shows the different components of the GUI.
Some example commands you can try:
-
liststudent: Shows an expanded list of all students. -
addstudent s/John Doe m/A0123459G: Adds a student namedJohn Doewith matriculation (matric) numberA0123459Gto JARVIS. -
deletestudent 3: Deletes the 3rd student shown in the student list. -
clear: Deletes all students, tasks and lessons. Use this command to delete the sample data in JARVIS before adding your own data. -
exit: Exits the app.
-
-
Refer to the Basic commands below to get started with the basic commands.
Basic commands
This section contains the basic commands of JARVIS.
Viewing help : help
Shows a message explaining how to access our user guide, which provides detailed information on how to use JARVIS.

Format: help
Listing all students : liststudent
Shows an expanded list of all your students, so that you can see all the student details.
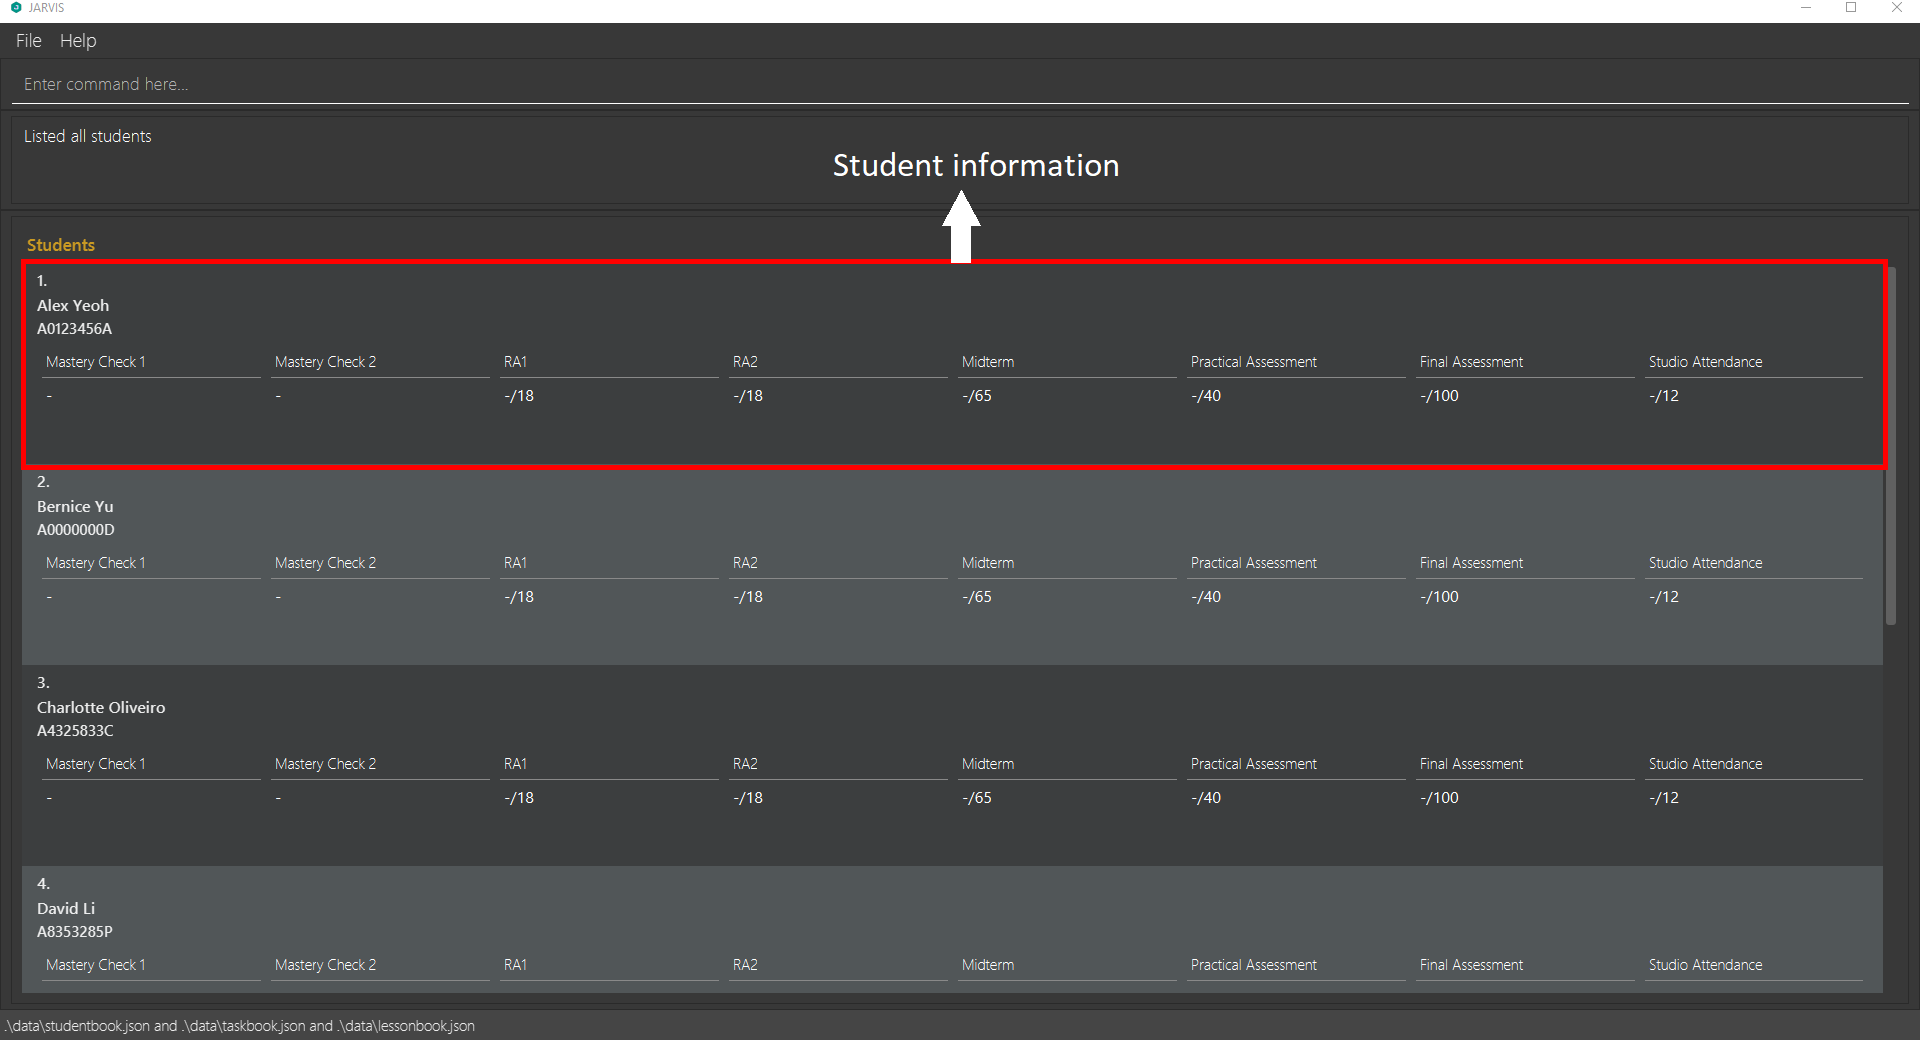
Format: liststudent
![]() Note:
Note:
- Additional information such as grades for each student will be displayed.
Listing all tasks : listtask
Shows an expanded list of all your tasks, so that you can see all the task details.
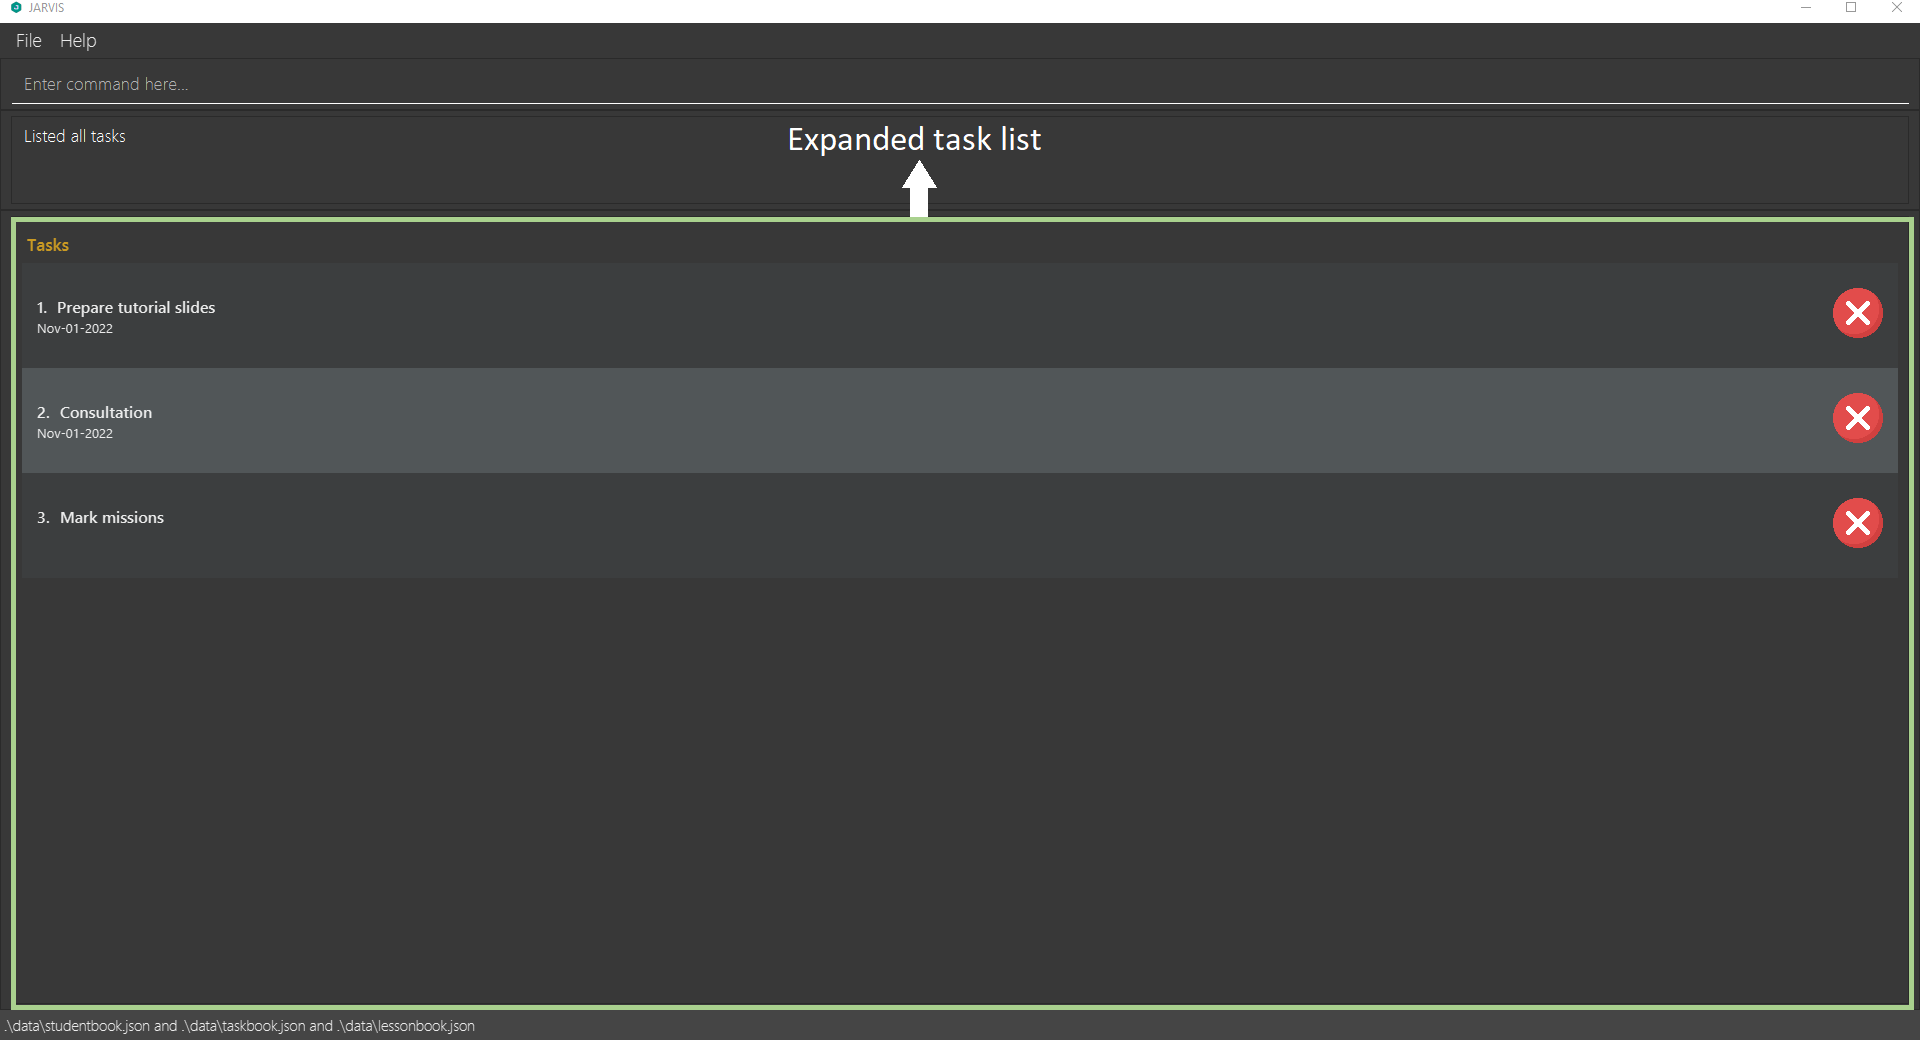
Format: listtask
Listing all lessons : listlesson
Shows an expanded list of all your lessons, so that you can see all the lesson details.
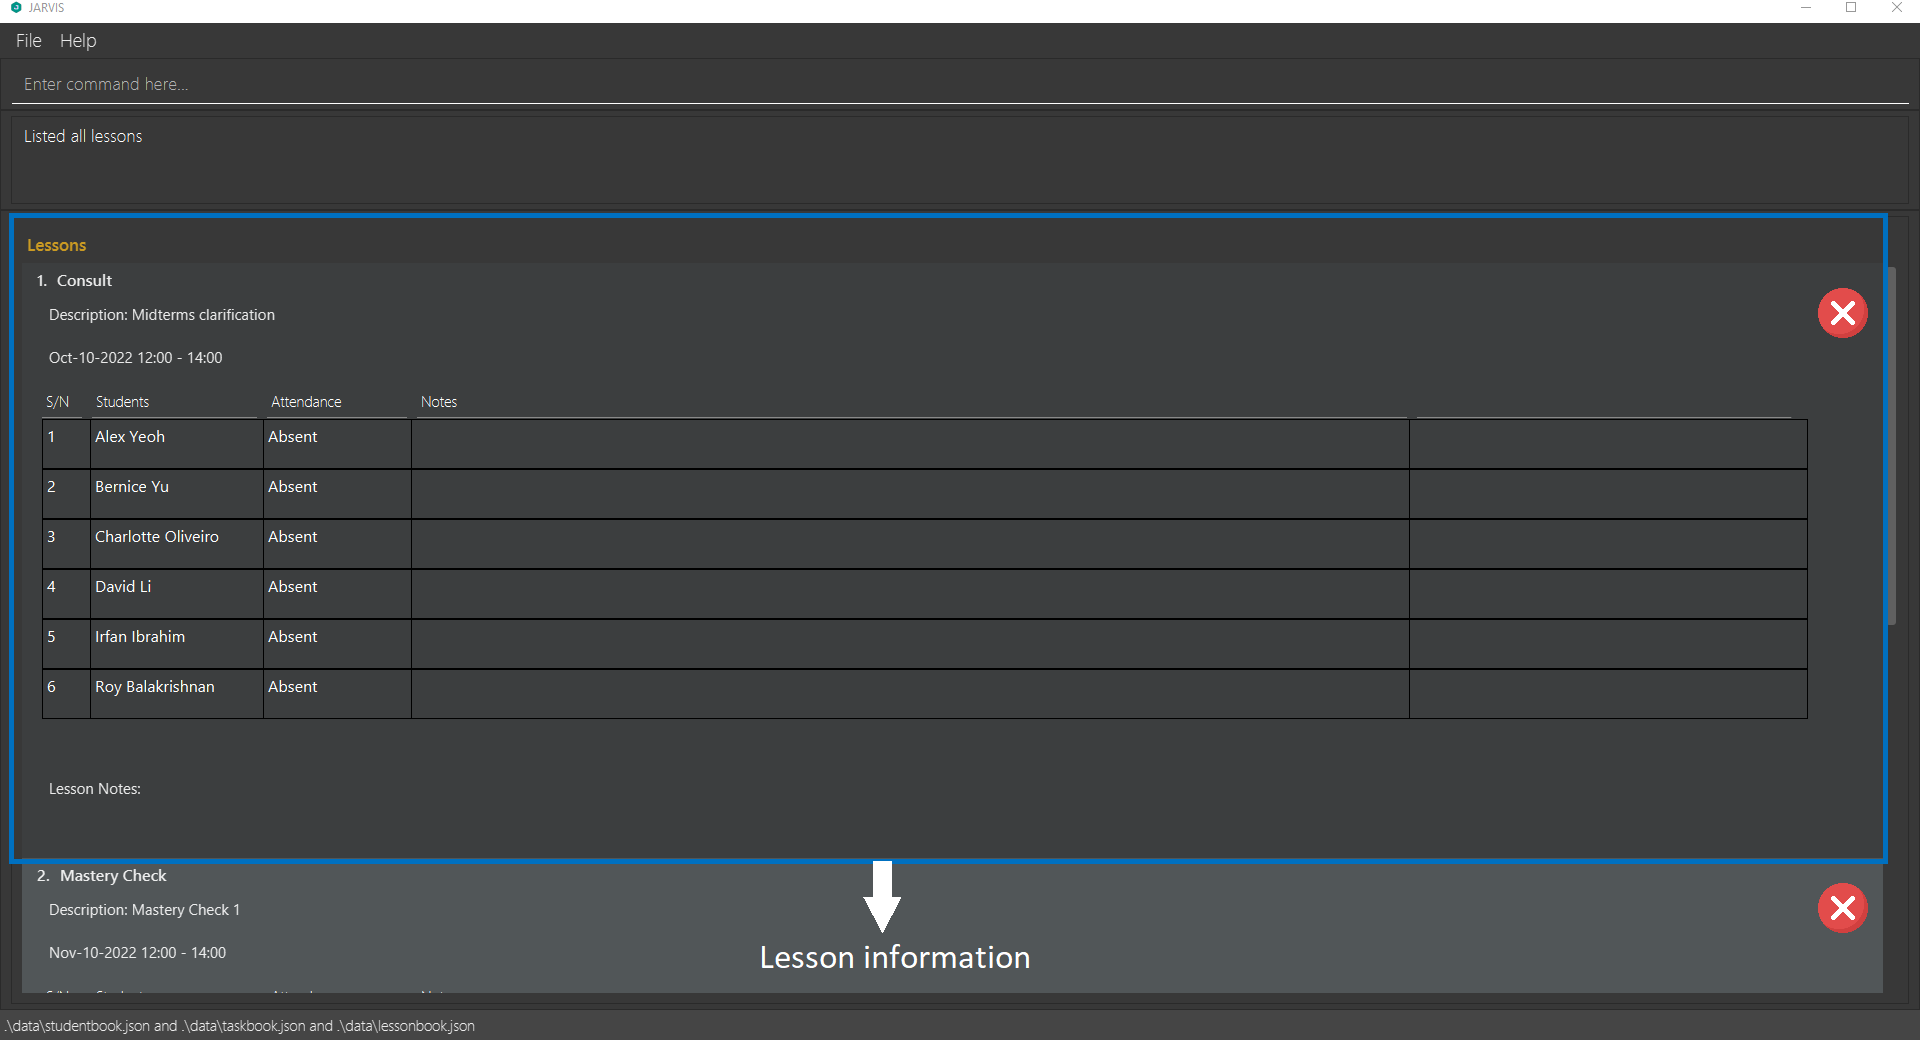
Format: listlesson
![]() Note:
Note:
- Additional information such as student participation and notes for each lesson will be displayed.
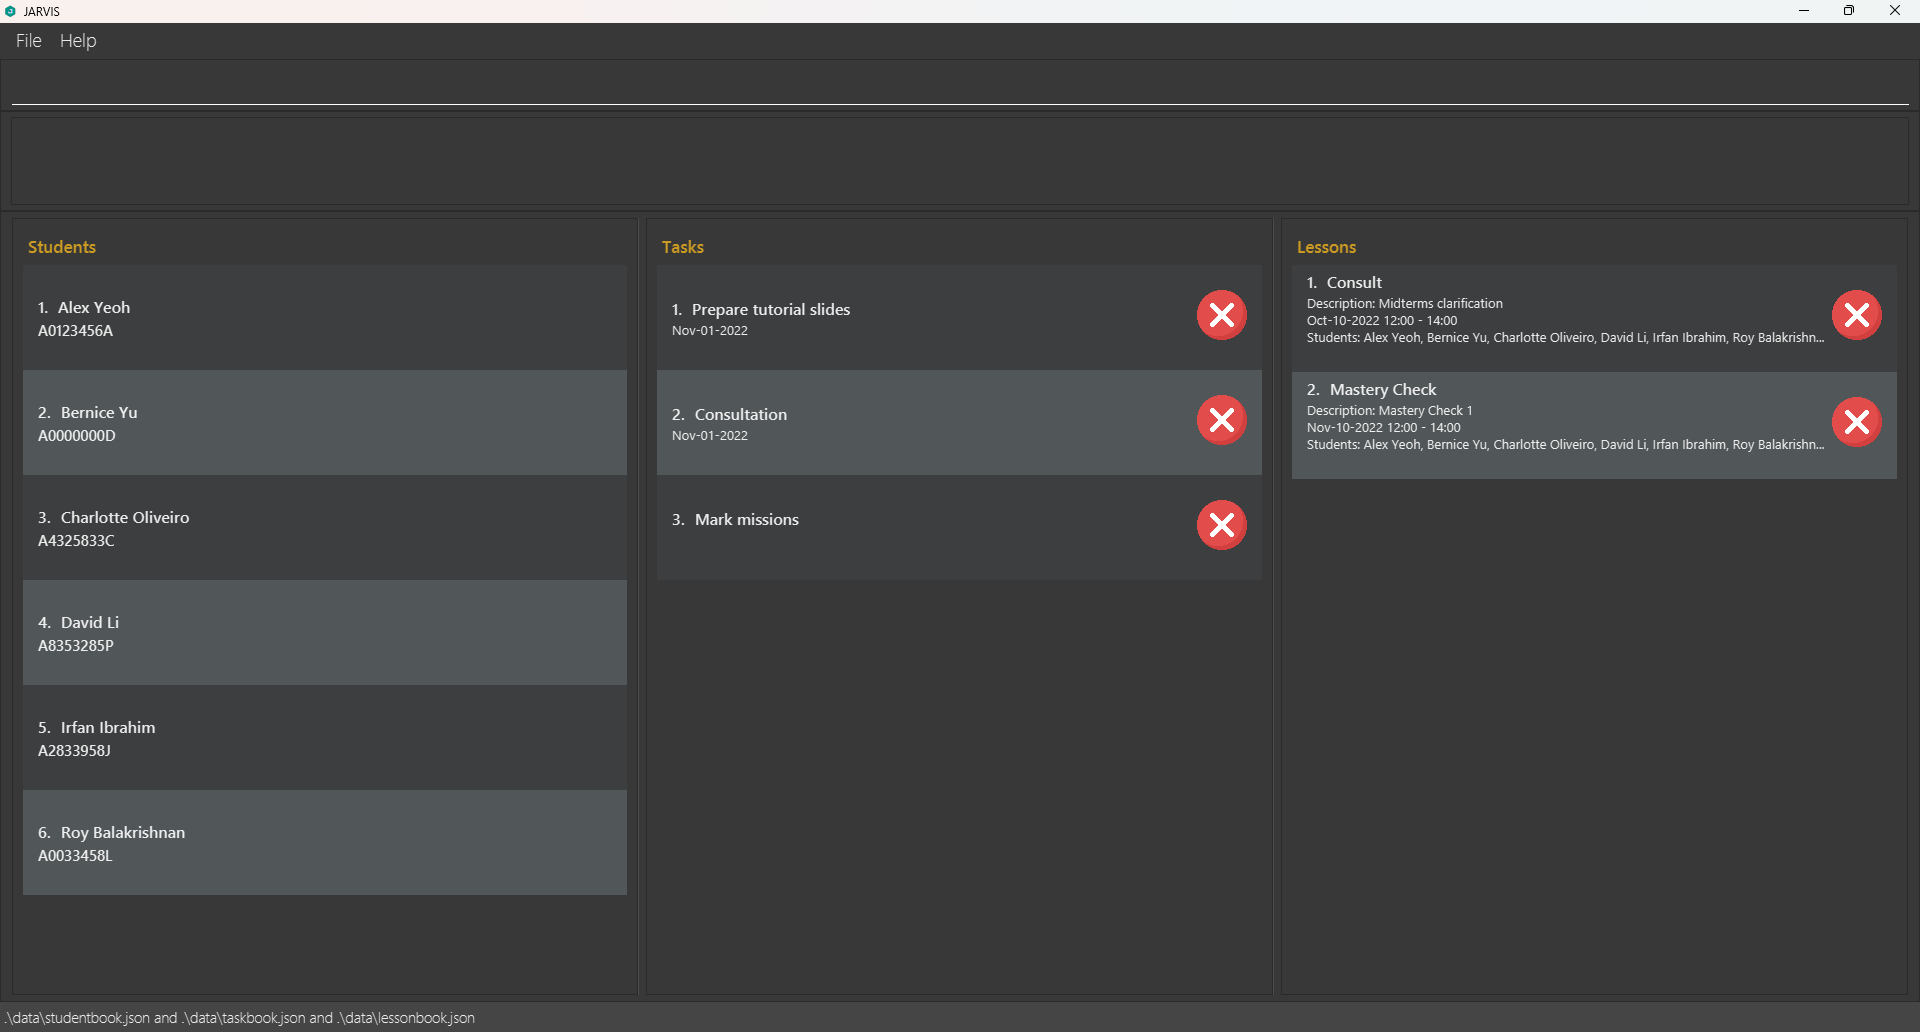
Listing all students, tasks and lessons : listall
Shows an overview of your student, task and lesson lists.
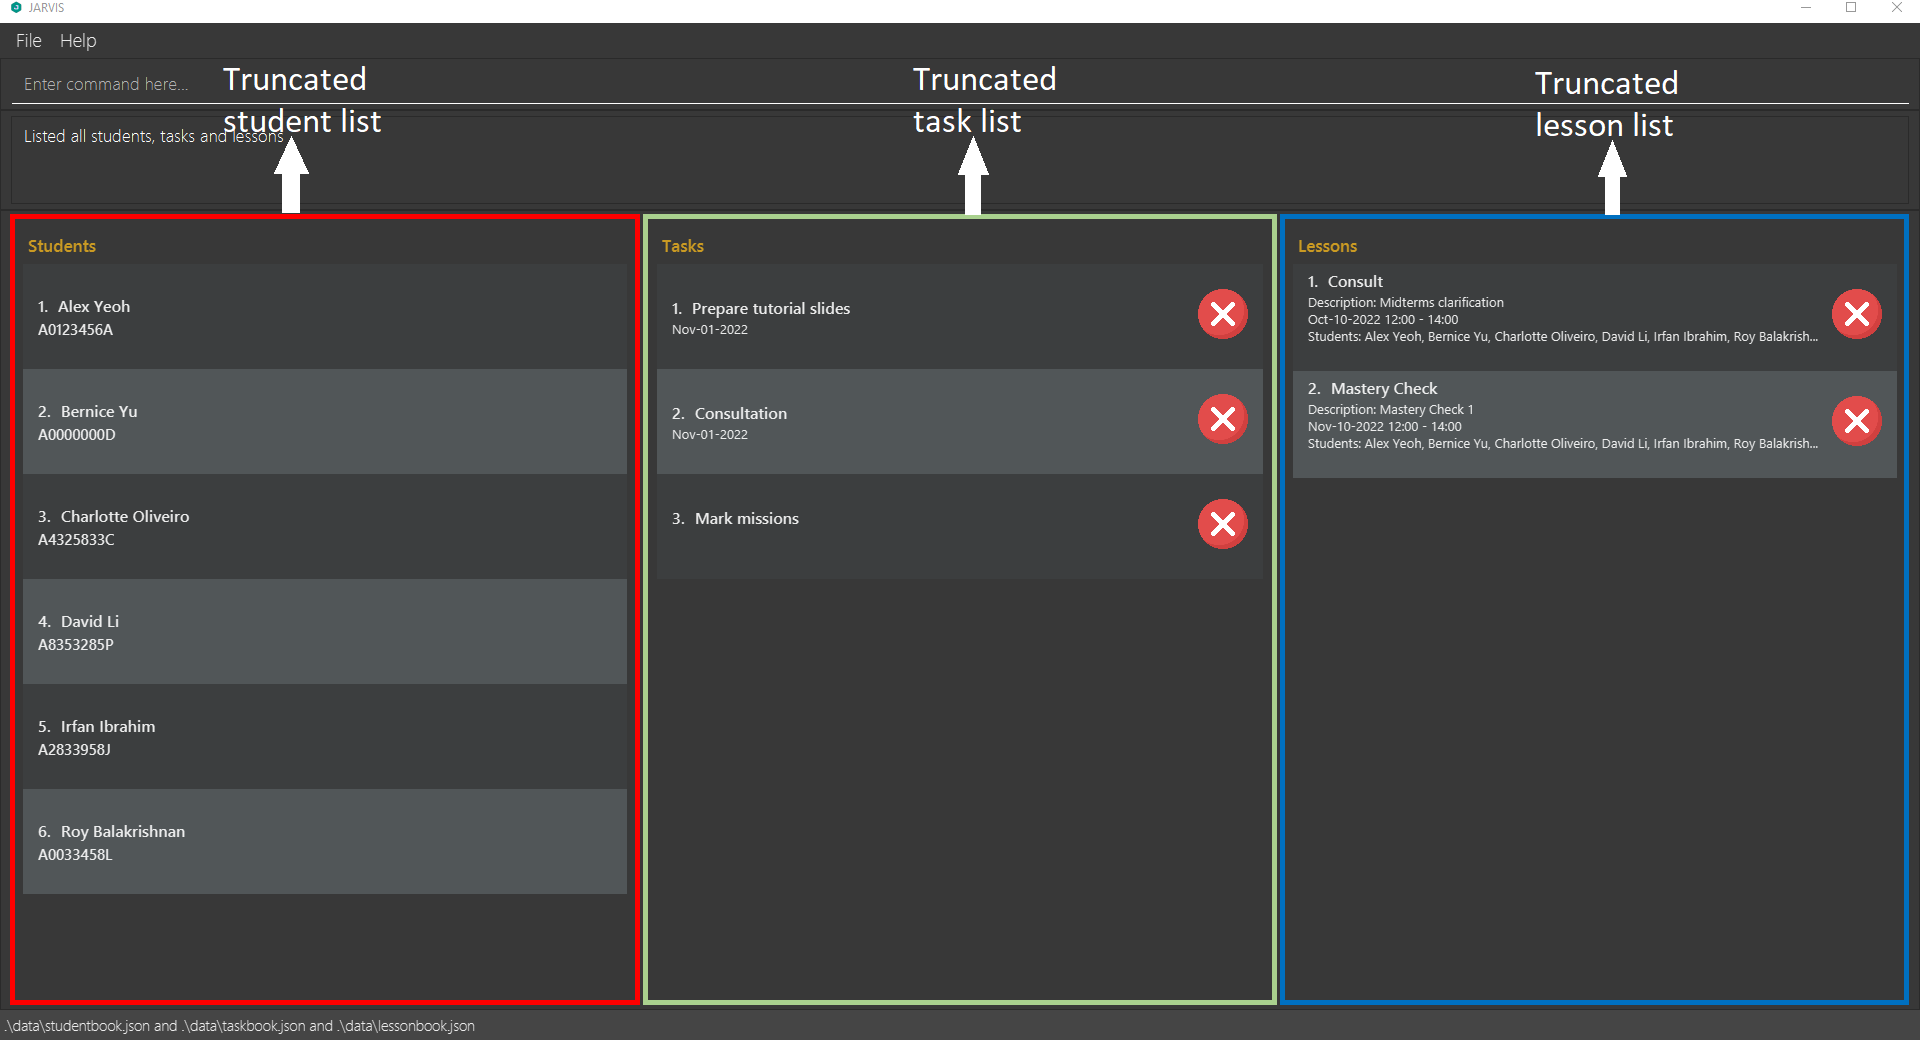
Format: listall
![]() Note:
Note:
- The three lists will be arranged in the order: students, tasks, lessons.
- Additional information will be hidden to provide an overview of all three lists.
- Students in the student list are sorted in ascending order according to the lexicographical order of their names. Students with the same name are sorted similarly according to their matric number.
- Tasks that are not done are grouped at the top of the list while tasks that are done are grouped at the bottom. In the group of tasks that are not done, the tasks are sorted with the earliest deadline tasks at the top. In the group of tasks that are done, the tasks are sorted with the latest deadline tasks at the top. Tasks without deadlines are placed below tasks with deadlines.
- Lessons that are not completed are grouped at the top of the list while lessons that are completed are grouped at the bottom. In the group of lessons that are not completed, the lessons are sorted with the earliest lessons at the top. In the group of lessons that are completed, the lessons are sorted with the latest lessons at the top.
Clearing all entries : clear
Clears all students, tasks and lessons from JARVIS.
Format: clear
Exiting the program : exit
Exits the program. Your changes will be saved automatically.
Format: exit
Student commands
This section contains commands for managing students.
Adding a student : addstudent
Adds a student with name and matric number to your student list.
Format: addstudent s/NAME m/MATRIC_NUM
-
m/MATRIC_NUMmust start with ‘A’, followed by 7 digits and a capital letter. - A maximum of 10 students can exist in your student list at any point in time. You will not be allowed to add more students after reaching the limit of 10 students.
-
MATRIC_NUMprovided must not already exist in your student list.
Examples:
-
addstudent s/John Doe m/A0123459Gadds a student namedJohn Doewith matric numberA0123459Gto your student list. -
addstudent s/Alex Yeoh m/A0123456Aadds a student namedAlex Yeohwith matric numberA0123456Ato your student list.
Deleting a student : deletestudent
Deletes a student from your student list based on the student index.
Format: deletestudent STUDENT_INDEX
-
STUDENT_INDEXrefer to the index number shown in your student list. -
STUDENT_INDEXmust be a positive integer 1, 2, 3, …
Examples:
-
deletestudent 2deletes the 2nd student shown in your student list.
Editing a student : editstudent
Edits the details of an existing student in your student list based on the student index. You have to provide the new name and/or matric number to be edited.
Format: editstudent STUDENT_INDEX [s/NAME] [m/MATRIC_NUM]
- Edits the student at the specified
STUDENT_INDEX. The index refers to the index number shown in the displayed student list. -
STUDENT_INDEXmust be a positive integer 1, 2, 3, … - At least one of the optional fields must be provided.
- Existing values will be updated to the input values.
Examples:
-
editstudent 1 s/John Doedits the name of the 1st student in your student list to beJohn Do. The matric number of the 1st student will remain the same. -
editstudent 2 s/Alex Li m/A1234567Zedits the name of the 2nd student in your student list to beAlex Liand matric number to beA1234567Z.
editstudent command to change the name(s) of the students so that you can differentiate them easily.
Locating students by name : findstudent
Finds students whose names contain any of the given keywords, so that you can search for students easily.
Format: findstudent KEYWORD [MORE_KEYWORDS]
- The search is case-insensitive. e.g.
hanswill matchHans. - The order of the keywords does not matter. e.g.
Hans Bowill matchBo Hans. - Only the name is searched.
- Only full words will be matched e.g.
Hanwill not matchHans. - Students with names matching at least one keyword will be returned (i.e.
ORsearch) e.g.Hans Bowill returnHans Gruber,Bo Yang
Examples:
-
findstudent yeohon the sample data you start with filters the student list to contain onlyAlex Yeoh.
Adding grades to a student : grade
Records grades for a student’s assessments, so that you can keep track of their grades.
Format: grade STUDENT_INDEX [ra1/MARKS] [ra2/MARKS] [mt/MARKS] [pa/MARKS] [fn/MARKS]

- Add grades to the student at the specified
STUDENT_INDEX. The index refers to the index number shown in the displayed student list. -
STUDENT_INDEXmust be a positive integer 1, 2, 3, … -
ra1/MARKSis optional, if specified will record a grade for RA1 (Reading Assessment 1). -
ra2/MARKSis optional, if specified will record a grade for RA2 (Reading Assessment 2). -
mt/MARKSis optional, if specified will record a grade for Midterm. -
pa/MARKSis optional, if specified will record a grade for Practical Assessment. -
fn/MARKSis optional, if specified will record a grade for Final Assessment. - At least one of the optional fields must be provided.
Examples:
-
grade 1 ra1/17 mt/55records the grades for the 1st student in your student list: 17 marks for RA1 and 55 marks for midterms.
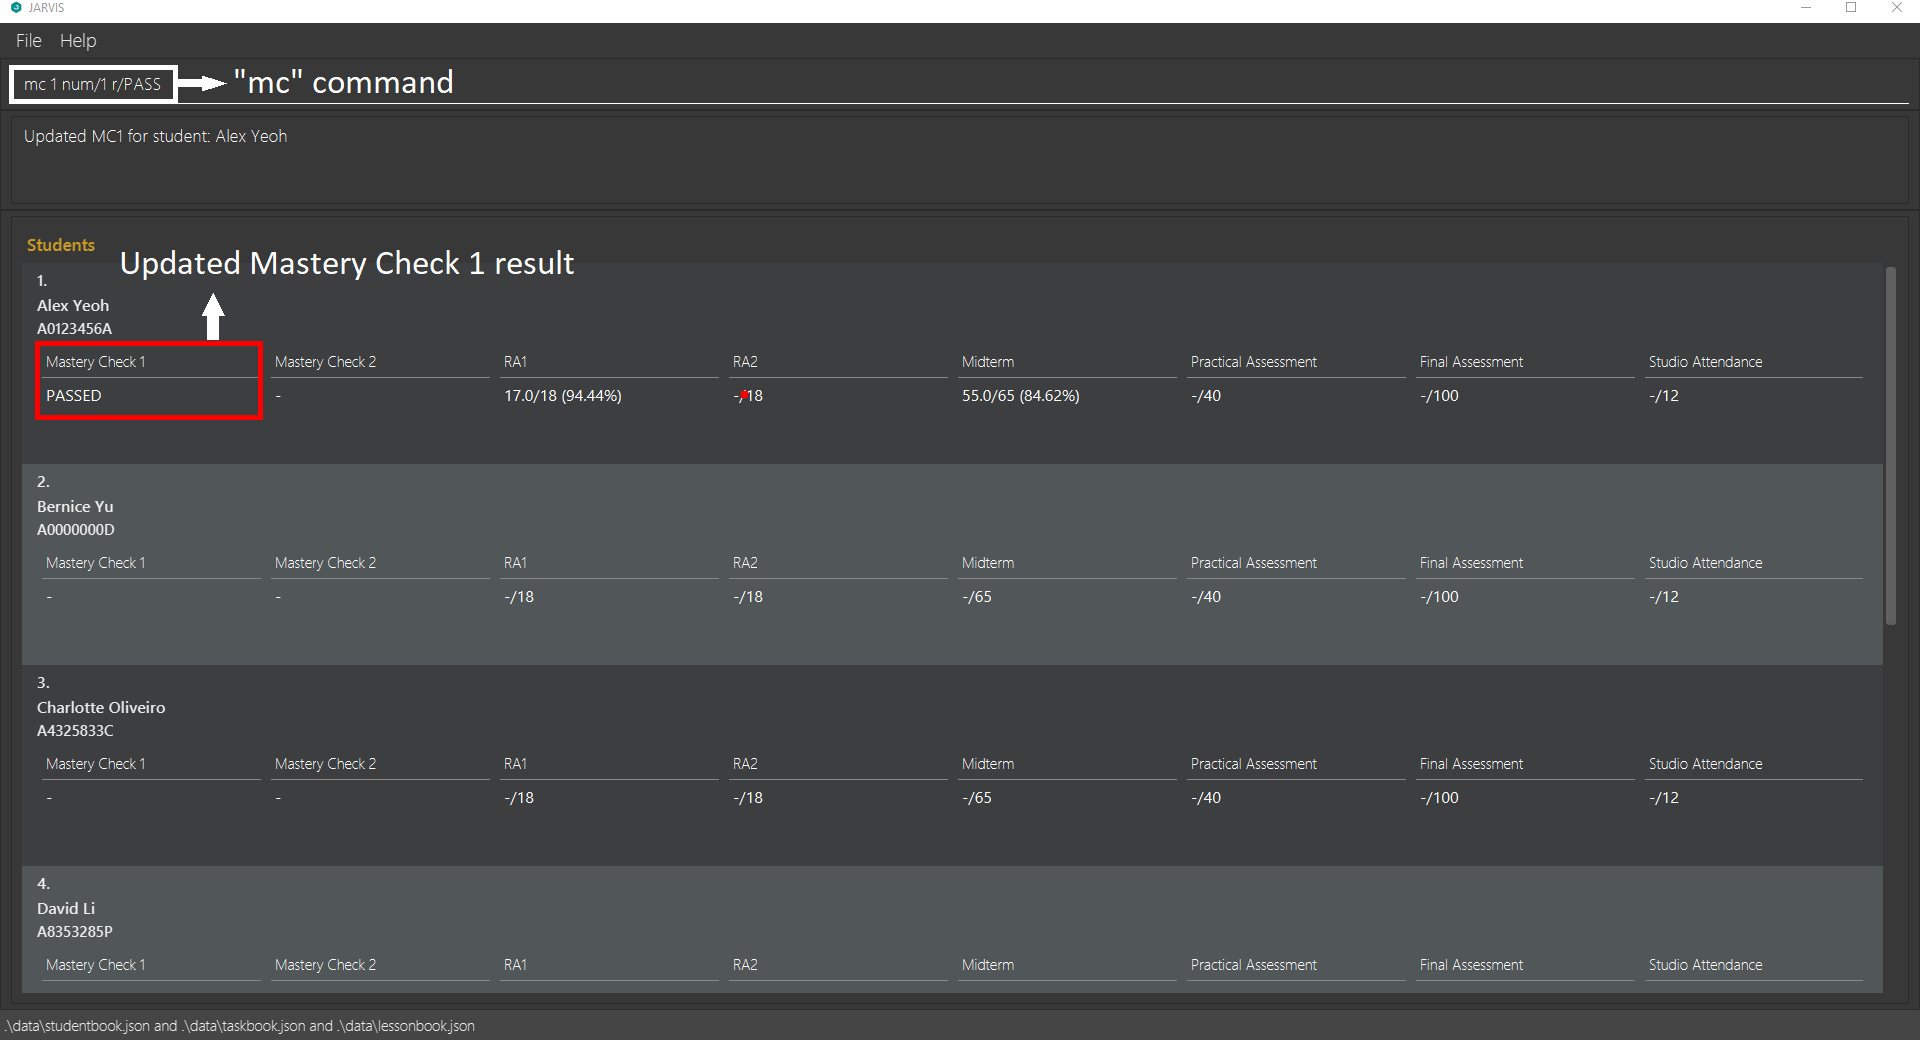
Setting mastery check result for a student : mc
Sets mastery check result for a student, so that you can keep track of which students have completed or need to complete this assessment.
Format: mc STUDENT_INDEX num/MC_NUM r/MC_RESULT
- Sets mastery check result for the student at the specified
STUDENT_INDEX. The index refers to the index number shown in the displayed student list. -
STUDENT_INDEXmust be a positive integer 1, 2, 3, … -
MC_NUMmust be 1 or 2, referring to Mastery Check 1 or 2. -
MC_RESULTmust be “pass” or “fail”. -
MC_RESULTis not case-sensitive.
Examples:
-
mc 1 num/1 r/passsets the mastery check result for the 1st student in your student list toPASS.
Task commands
This section contains commands for managing tasks.
Adding a task : addtask
Adds a task with description and optional deadline to your task list.
Format: addtask t/TASK_DESC [d/DEADLINE]
-
d/DEADLINEis optional, if specified will indicate a deadline for the task. -
d/DEADLINEshould be in the formatyyyy-MM-dd. - Task to be added must not already exist in the task list.
Examples:
-
addtask t/Prepare tutorial slides d/2022-11-01adds a task with descriptionPrepare tutorial slidesand deadline ofNov-11-2022to your task list. -
addtask t/Mark missionsadds a task with descriptionMark missionsand no deadline to your task list.
Deleting a task : deletetask
Deletes a task from your task list based on the task index.
Format: deletetask TASK_INDEX
-
TASK_INDEXrefer to the index number shown in your task list. -
TASK_INDEXmust be a positive integer 1, 2, 3, …
Examples:
-
deletetask 2deletes the 2nd task in your task list.
Marking a task as done : marktask
Marks a task as done based on the task index.
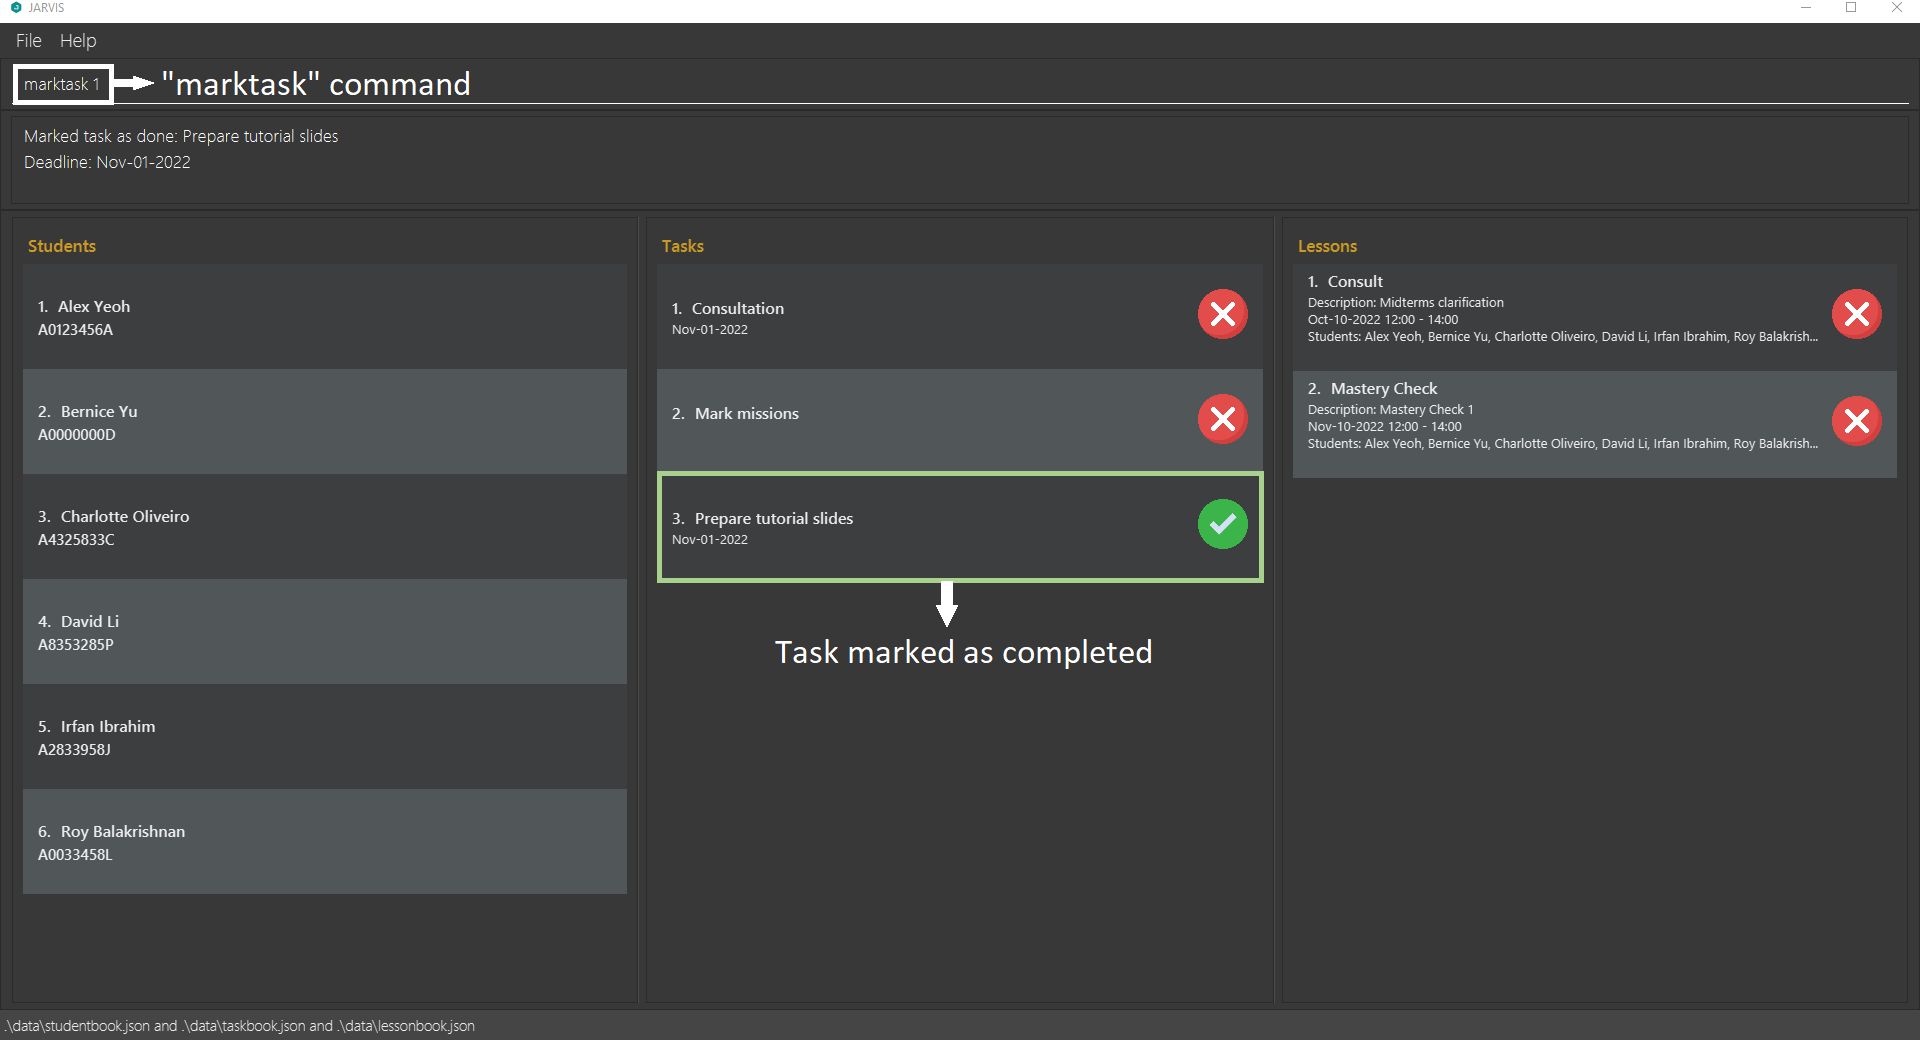
Format: marktask TASK_INDEX
-
TASK_INDEXrefers to the index number shown in the displayed list of tasks. -
TASK_INDEXmust be a positive integer 1, 2, 3, …
Example:
-
marktask 2marks the 2nd task in your task list as done.
Marking a task as not done : unmarktask
Marks a task as not done based on the task index.
Format: unmarktask TASK_INDEX
-
TASK_INDEXrefers to the index number shown in the displayed list of tasks. -
TASK_INDEXmust be a positive integer 1, 2, 3, …
Example:
-
unmarktask 2marks the 2nd task in your task list as not done.
Lesson commands
This section contains commands for managing lessons.
Adding a studio lesson : addstudio
Adds a studio lesson to your lesson list.
Format: addstudio [l/LESSON_DESC] sd/START_DATE st/START_TIME [ed/END_DATE] et/END_TIME
-
l/LESSON_DESCis optional. -
sd/START_DATEanded/END_DATEshould be in the formatyyyy-MM-dd. -
st/START_TIMEandet/END_TIMEshould be in the formathh:mm. -
ed/END_DATEis optional, if unspecifiedEND_DATEwill be assumed to be the same asSTART_DATE. - Studio to be added must not already exist in your lesson list.
- Studio to be added must not clash in timing with other lessons in your lesson list.
Examples:
-
addstudio l/Studio 3 sd/2022-10-12 st/14:00 et/16:00adds a studio lesson with descriptionStudio 3onOct-12-2022from14:00to16:00.
Adding a consult lesson : addconsult
Adds a consult lesson to your lesson list.
Format: addconsult [l/LESSON_DESC] sd/START_DATE st/START_TIME [ed/END_DATE] et/END_TIME si/STUDENT_INDEX...
-
l/LESSON_DESCis optional. -
sd/START_DATEanded/END_DATEshould be in the formatyyyy-MM-dd. -
st/START_TIMEandet/END_TIMEshould be in the formathh:mm. -
ed/END_DATEis optional, if unspecifiedEND_DATEwill be assumed to be the same asSTART_DATE. -
si/STUDENT_INDEXcan be specified one or more times according to the number of attending students. - Consult to be added must not already exist in your lesson list.
- Consult to be added must not clash in timing with other lessons in your lesson list.
Examples:
-
addconsult l/Consultation on recursion sd/2022-10-14 st/12:00 et/14:00 si/3 si/4adds a consult lesson with descriptionConsultation on recursiononOct-14-2022from12:00to14:00with the 3rd and 4th student in your student list. -
addconsult sd/2022-10-15 st/23:00 ed/2022-10-16 et/00:00 si/1adds a consult lesson fromOct-15-22 23:00toOct-16-22 00:00with the 1st student in your student list.
Adding a mastery check lesson : addmc
Adds a mastery check lesson to your lesson list.
Format: addmc [l/LESSON_DESC] sd/START_DATE st/START_TIME [ed/END_DATE] et/END_TIME si/STUDENT_INDEX...
-
l/LESSON_DESCis optional. -
sd/START_DATEanded/END_DATEshould be in the formatyyyy-MM-dd. -
st/START_TIMEandet/END_TIMEshould be in the formathh:mm. -
ed/END_DATEis optional, if unspecifiedEND_DATEwill be assumed to be the same asSTART_DATE. -
si/STUDENT_INDEXcan be specified one or more times according to the number of attending students. - Mastery Check to be added must not already exist in your lesson list.
- Mastery Check to be added must not clash in timing with other lessons in your lesson list.
Examples:
-
addmc l/Mastery check 1 sd/2022-10-12 st/12:00 et/14:00 si/1 si/2adds a mastery check lesson with descriptionMastery check 1onOct-20-2022from12:00to14:00with the 1st and 2nd student in your student list. -
addmc sd/2022-11-13 st/23:00 ed/2022-11-14 et/00:00 si/1adds a mastery check lesson fromNov-13-2022 23:00toNov-14-2022 00:00with the 1st student in your student list.
Deleting a lesson : deletelesson
Deletes a lesson from your lesson list based on the lesson index.
Format: deletelesson LESSON_INDEX
-
LESSON_INDEXrefer to the index number shown in your lesson list. -
LESSON_INDEXmust be a positive integer 1, 2, 3, …
Examples:
-
deletelesson 2deletes the 2nd lesson in your lesson list.
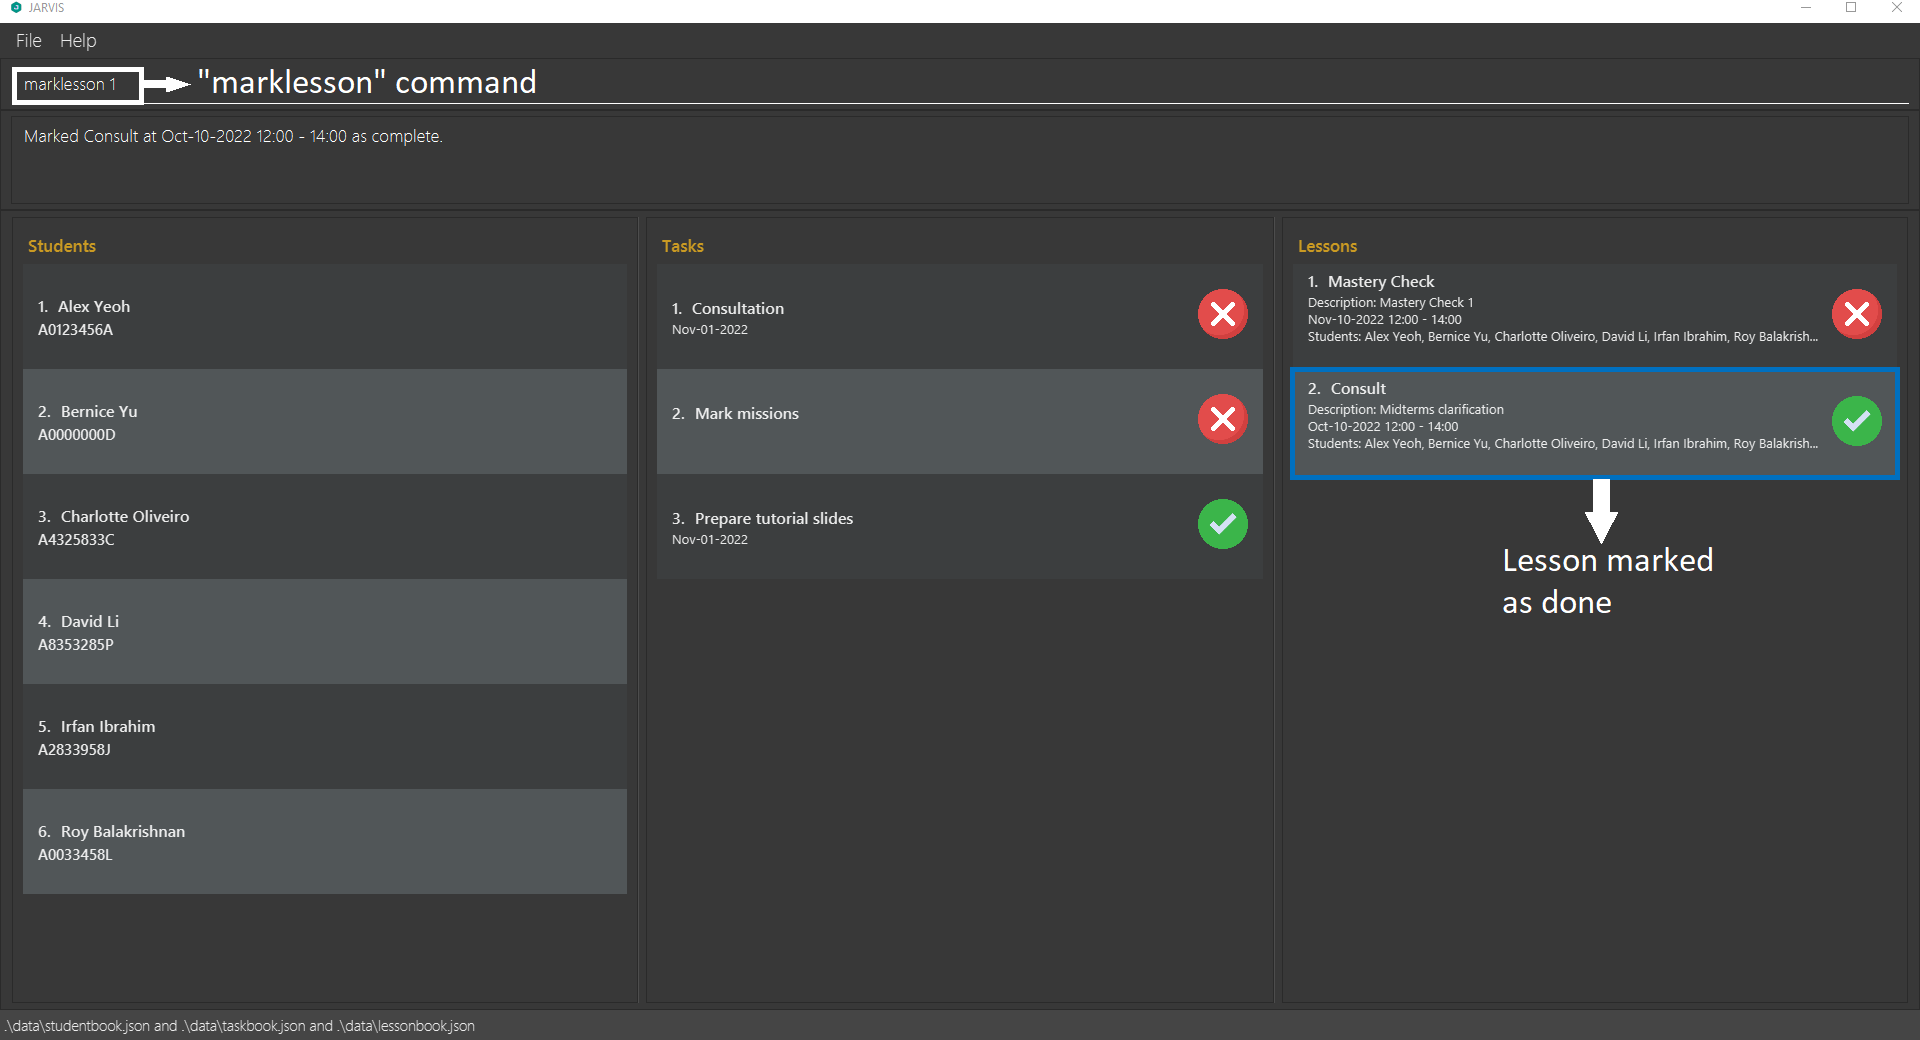
Marking a lesson as completed : marklesson
Marks a lesson as completed based on the lesson index.
Format: marklesson LESSON_INDEX
-
LESSON_INDEXrefer to the index number shown in your lesson list. -
LESSON_INDEXmust be a positive integer 1, 2, 3, …
Example:
-
marklesson 2marks the 2nd lesson in your lesson list as completed.
Marking a lesson as not completed : unmarklesson
Marks a lesson as not completed based on the lesson index.
Format: unmarklesson LESSON_INDEX
-
LESSON_INDEXrefer to the index number shown in your lesson list. -
LESSON_INDEXmust be a positive integer 1, 2, 3, …
Example:
-
unmarklesson 2marks the 2nd lesson in your lesson list as not completed.
Marking a student as present for a lesson : markstudent
Marks a student as present for a lesson, so that you can take attendance easily.
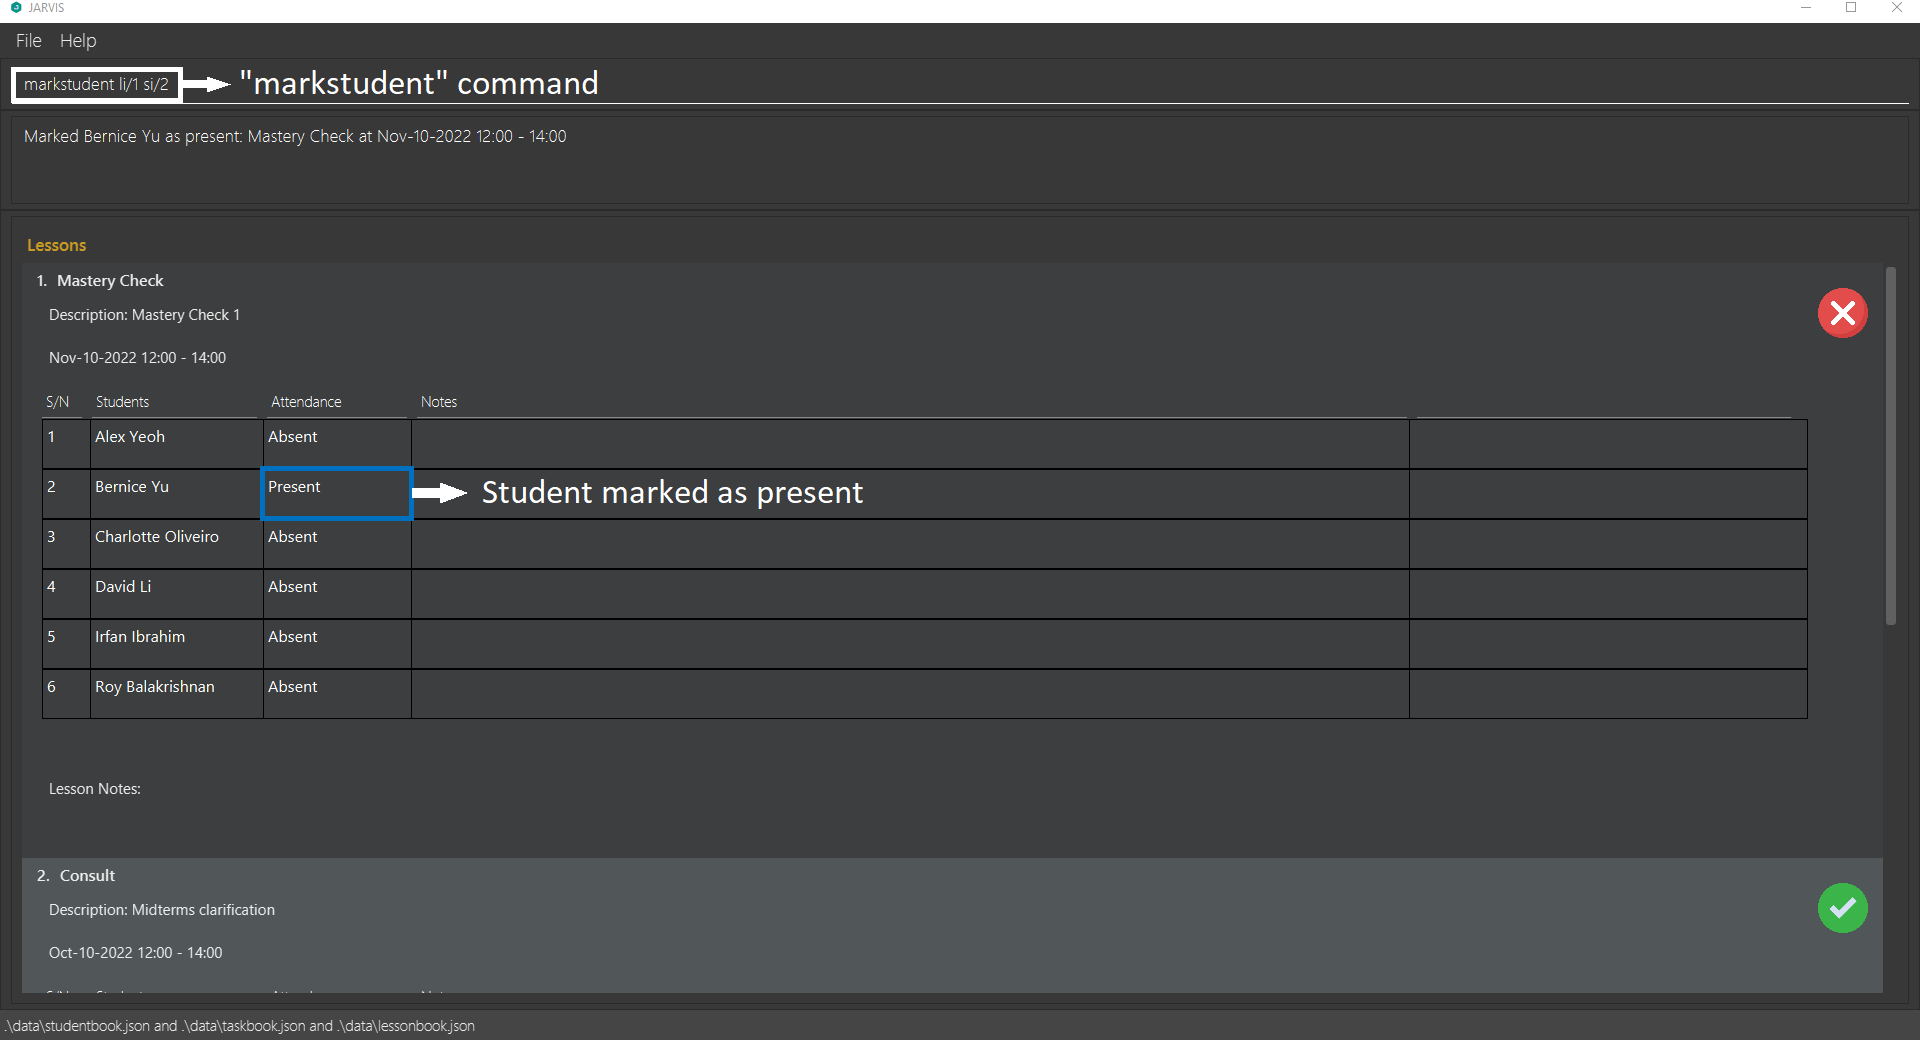
Format: markstudent li/LESSON_INDEX si/STUDENT_INDEX
-
LESSON_INDEXrefers to the index number shown in the displayed list of lessons. -
STUDENT_INDEXrefers to the index number shown in the student list for the specified lesson. (uselistlessonto view the student list for lessons) -
LESSON_INDEXandSTUDENT_INDEXmust be a positive integer 1, 2, 3, …
Example:
-
markstudent li/2 si/3marks the 3rd student in the 2nd lesson in your lesson list as present.
Marking a student as absent for a lesson : unmarkstudent
Marks a student as absent for a lesson, so that you can take attendance easily.
Format: unmarkstudent li/LESSON_INDEX si/STUDENT_INDEX
-
LESSON_INDEXrefers to the index number shown in the displayed list of lessons. -
STUDENT_INDEXrefers to the index number shown in the student list for the specified lesson. (uselistlessonto view the student list for lessons) -
LESSON_INDEXandSTUDENT_INDEXmust be a positive integer 1, 2, 3, …
Example:
-
unmarkstudent li/2 si/3marks the 3rd student in the 2nd lesson in your lesson list as absent.
Adding a note to a lesson : addnote
Adds a note for a lesson or for a specific student in a lesson, so that you can take down notes in an organised manner.
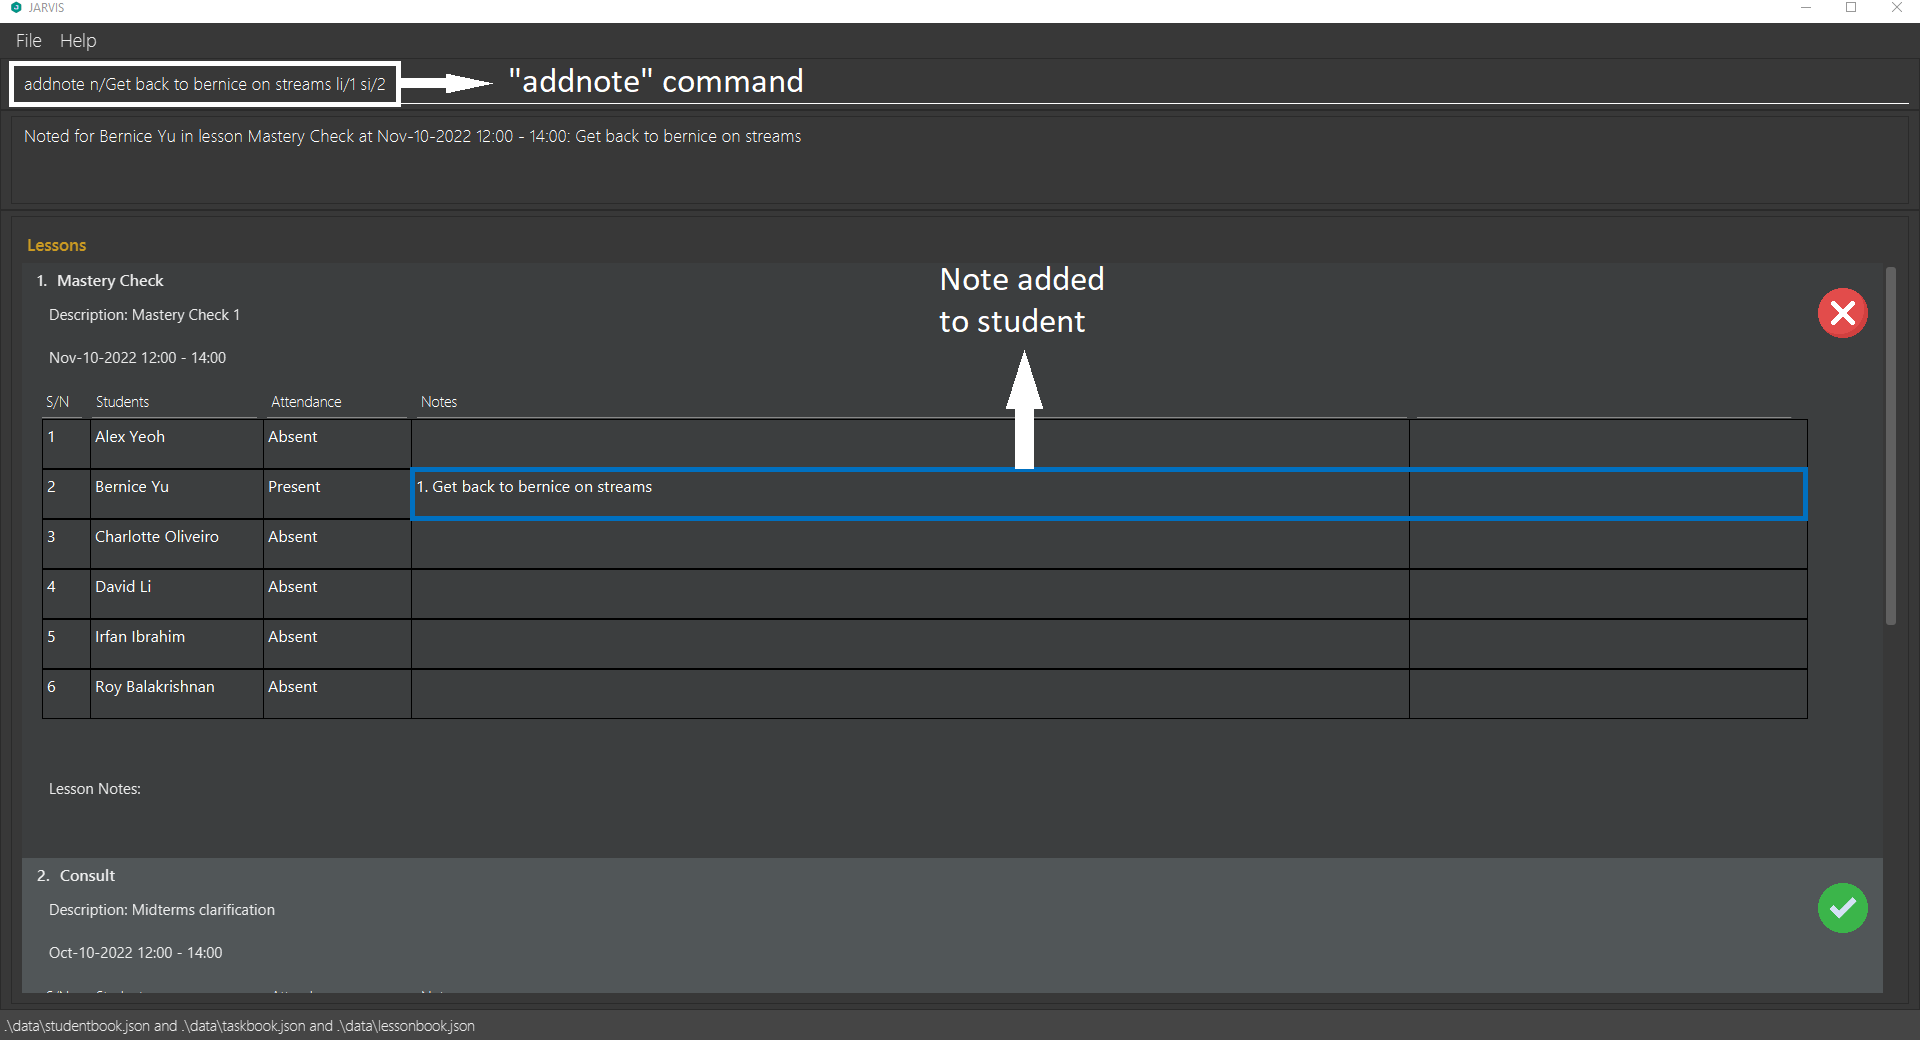
Format: addnote n/NOTE li/LESSON_INDEX [si/STUDENT_INDEX]
-
si/STUDENT_INDEXis optional, if specified the command will add to corresponding student notes. -
LESSON_INDEXrefers to the index number shown in the displayed list of lessons. -
STUDENT_INDEXrefers to the index number shown in the student list for the specified lesson. (uselistlessonto view the student list for lessons) -
LESSON_INDEXandSTUDENT_INDEXmust be a positive integer 1, 2, 3, …
Example:
-
addnote n/Get back to jeff on streams li/1 si/2adds a note for the 2nd student in the 1st lesson in your lesson list. -
addnote n/Get back to the class on streams li/2adds a note for the 2nd lesson in your lesson list.
Deleting a note from a lesson : deletenote
Deletes a note for a lesson or for a specific student in a lesson.
Format: deletenote ni/NOTE_INDEX li/LESSON_INDEX [si/STUDENT_INDEX]
-
si/STUDENT_INDEXis optional, if specified the command will delete from the corresponding student notes. -
NOTE_INDEXrefers to the index number shown in the displayed list of notes for a lesson or for a specific student in a lesson. (uselistlessonto view the note lists for lessons) -
LESSON_INDEXrefers to the index number shown in the displayed list of lessons. -
STUDENT_INDEXrefers to the index number shown in the student list for the specified lesson. (uselistlessonto view the student list for lessons) -
NOTE_INDEX,LESSON_INDEXandSTUDENT_INDEXmust be a positive integer 1, 2, 3, …
Example:
-
deletenote ni/1 li/1 si/2deletes the 1st note for the 2nd student in the 1st lesson in your lesson list. -
deletenote ni/2 li/1deletes the 2nd note from the 1st lesson in your lesson list.
Adding participation for a student in a lesson : addpart
Adds participation for a student in a lesson, so that you can track class participation easily.
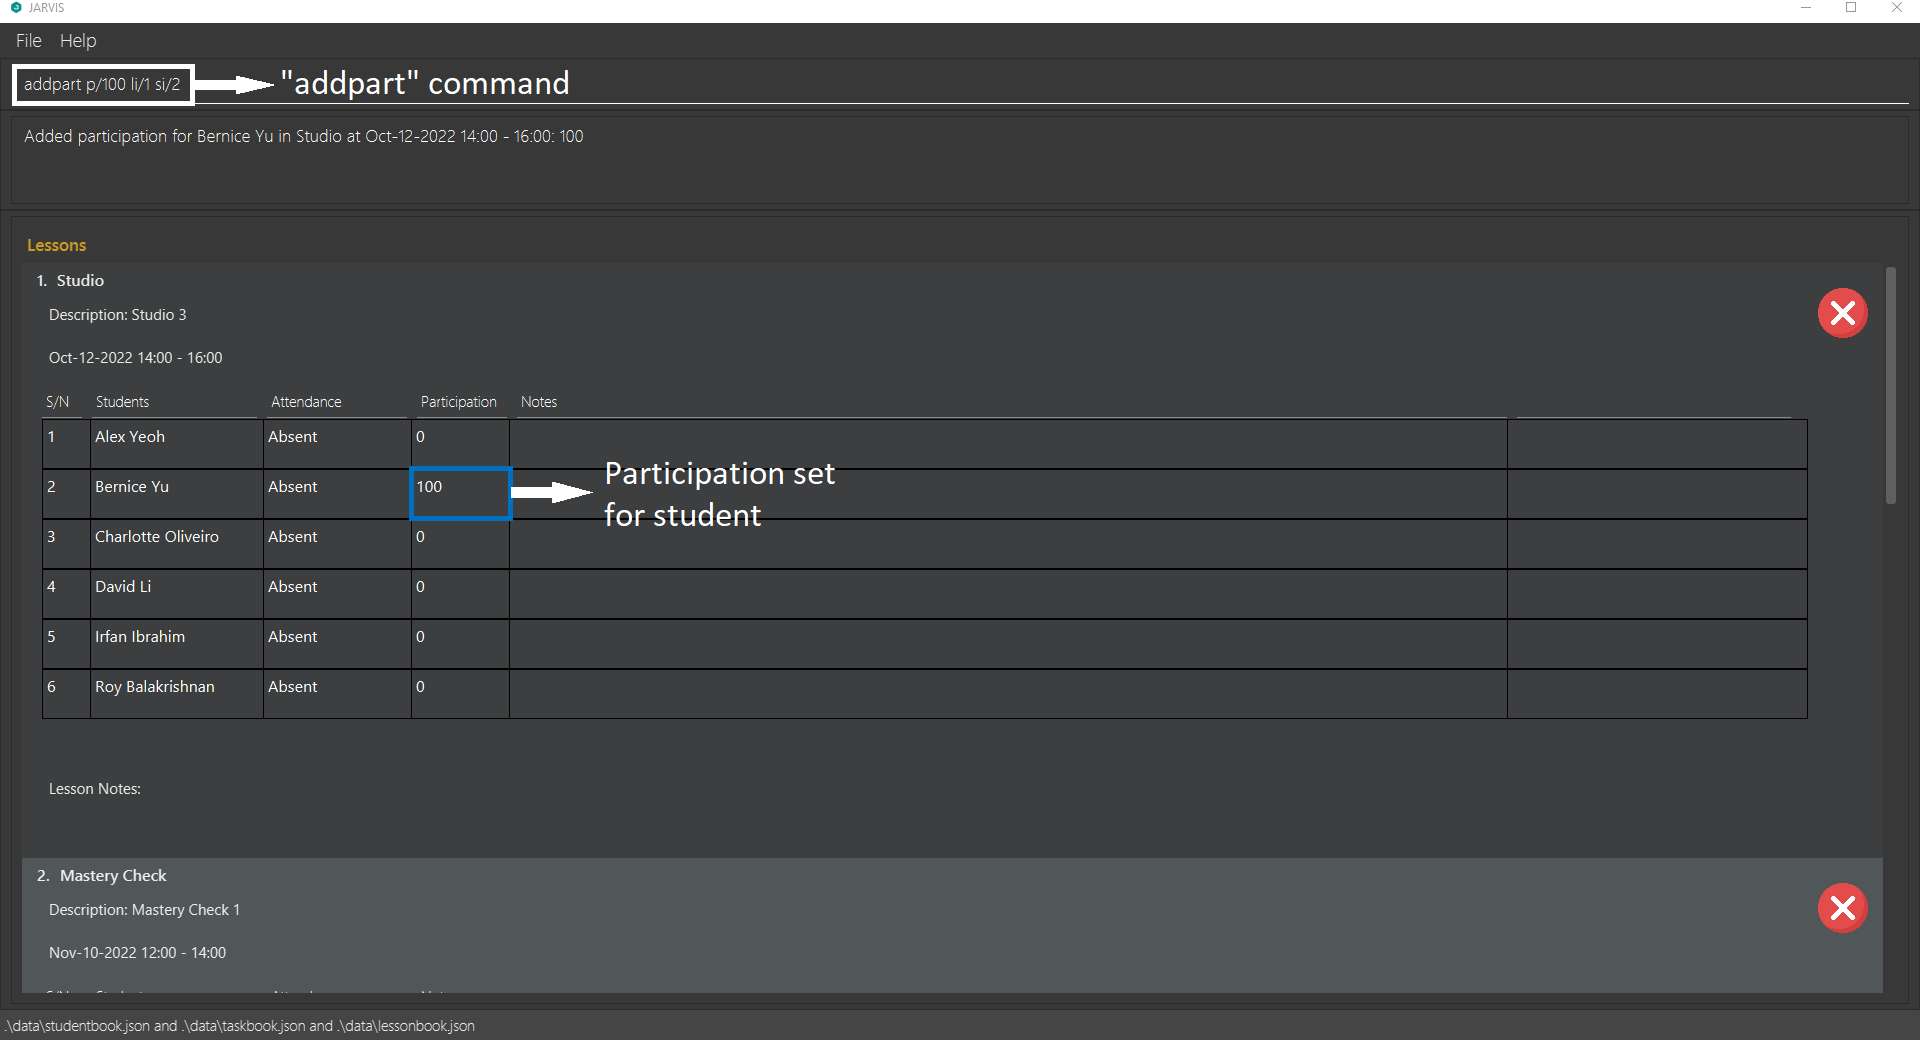
Format: addpart p/PARTICIPATION li/LESSON_INDEX si/STUDENT_INDEX
-
PARTICIPATIONmust be a non-negative integer from 0 to 500. -
LESSON_INDEXrefers to the index number shown in the displayed list of lessons. -
LESSON_INDEXmust refer to a studio (not a consult or mastery check lesson). -
STUDENT_INDEXrefers to the index number shown in the student list for the specified lesson. (uselistlessonto view the student list for lessons) -
LESSON_INDEXandSTUDENT_INDEXmust be a positive integer 1, 2, 3, …
Example:
-
addpart p/100 li/1 si/2sets participation for the 2nd student in the 1st lesson in your lesson list to be 100.
Saving the data
JARVIS data is saved in your hard disk automatically after any command that changes the data. There is no need to save manually.
Editing the data file
JARVIS data is saved in 3 JSON files:
-
[JAR file location]/data/studentbook.jsonfor student data -
[JAR file location]/data/taskbook.jsonfor task data -
[JAR file location]/data/lessonbook.jsonfor lesson data
If you are an advanced user, you may update data directly by editing the data files, but do heed the advisory below.
FAQ
Q: How do I transfer my data to another Computer?
A: Install the app in the other computer and overwrite the empty data files it creates with the files that contains the data of your previous JARVIS home folder.
Q: Can I import my timetable into JARVIS to manage my other lessons?
A: This functionality is currently not supported by JARVIS but could be implemented in the future.
Command summary
| Action | Format | Examples |
|---|---|---|
| Help | help |
|
| List students | liststudent |
|
| List tasks | listtask |
|
| List lessons | listlesson |
|
| List all | listall |
|
| Clear | clear |
|
| Add student | addstudent s/NAME m/MATRIC_NUM |
addstudent s/John Doe m/A0123459G |
| Delete student | deletestudent STUDENT_INDEX |
deletestudent 2 |
| Edit student | editstudent STUDENT_INDEX [s/NAME] [m/MATRIC_NUM] |
editstudent 1 s/John Do |
| Find student | findstudent KEYWORD [MORE_KEYWORDS] |
findstudent John |
| Add grade | grade STUDENT_INDEX [ra1/MARKS] [ra2/MARKS] [mt/MARKS] [pa/MARKS] [fn/MARKS] |
grade 1 ra1/17 mt/55 |
| Set mastery check result | mc STUDENT_INDEX num/MC_NUM r/MC_RESULT |
mc 1 num/1 r/PASS |
| Add task | addtask t/TASK_DESC [d/DEADLINE] |
addtask t/Prepare tutorial slides d/2022-11-01 |
| Delete task | deletetask TASK_INDEX |
deletetask 2 |
| Mark task | marktask TASK_INDEX |
marktask 2 |
| Unmark task | unmarktask TASK_INDEX |
unmarktask 2 |
| Add studio | addstudio [l/LESSON_DESC] sd/START_DATE st/START_TIME [ed/END_DATE] et/END_TIME |
addstudio l/Studio 3 sd/2022-10-12 st/14:00 et/16:00 |
| Add consult | addconsult [l/LESSON_DESC] sd/START_DATE st/START_TIME [ed/END_DATE] et/END_TIME si/STUDENT_INDEX... |
addconsult l/Consultation on recursion sd/2022-10-14 st/12:00 et/14:00 si/3 si/4 |
| Add mastery check | addmc [l/LESSON_DESC] sd/START_DATE st/START_TIME [ed/END_DATE] et/END_TIME si/STUDENT_INDEX... |
addmc l/Mastery check 1 sd/2022-10-12 st/12:00 et/14:00 si/1 si/2 |
| Delete lesson | deletelesson LESSON_INDEX |
deletelesson 2 |
| Mark lesson | marklesson LESSON_INDEX |
marklesson 2 |
| Unmark lesson | unmarklesson LESSON_INDEX |
unmarklesson 2 |
| Mark student | markstudent li/LESSON_INDEX si/STUDENT_INDEX |
markstudent li/2 si/3 |
| Unmark student | unmarkstudent li/LESSON_INDEX si/STUDENT_INDEX |
unmarkstudent li/2 si/3 |
| Add note | addnote n/NOTE li/LESSON_INDEX [si/STUDENT_INDEX] |
addnote n/Get back to jeff on streams li/1 si/2 |
| Delete note | deletenote ni/NOTE_INDEX li/LESSON_INDEX [si/STUDENT_INDEX] |
deletenote ni/1 li/1 si/2 |
| Add participation | addpart p/PARTICIPATION li/LESSON_INDEX si/STUDENT_INDEX |
addpart p/100 li/1 si/2 |